A Chia Pet DIY Adventure!
Every time I see a Chia Pet in a store I’m tempted to buy one but the $19.99 price always seems a bit steep for such a useless but never-the-less fun novelty garden item. It might be worth the price but I’m a little sceptical of any of the “As seen on TV” products especially after the Sea Monkey Fiasco of 1982. As a child growing up (before the days of the internet) I always used to see advertisements for sea monkeys in comic books. I wanted to send away for them so bad but my parents said that it would just be a waste of money and refused to let me spend my allowance on something so utterly useless. So when I was in my 20’s and living on my own I splurged about $10 (which was a fair amount of money in 1982) for the advertised Sea Monkey aquatic pet aquarium and eagerly awaited to see the sea monkeys develop as advertised. They actually turned out to be brine shrimp.
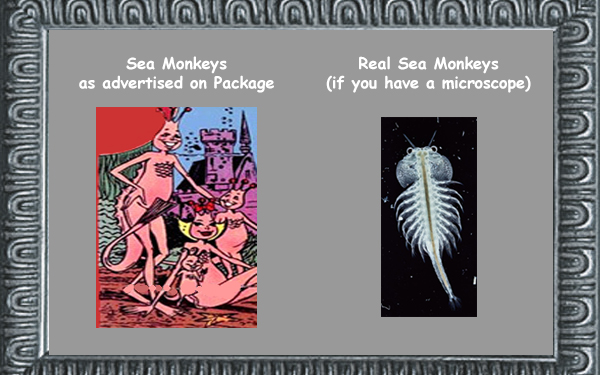
I don’t care what anyone says…a brine shrimp is not a pet and they did not in any way resemble the creature on the sea monkey package. The package also claimed that you could train them to do tricks.
I WAS DUPED!
At least that’s how I felt because I those brine shrimp did not look like sea monkeys and definitely weren’t capable of learning any tricks.
What can I say…my parents were right. I wasted my money.
Needless to say this guerrilla gardener did not want to risk being sucked in by the Chia Pet advertisements and now that I was an adult I really didn’t want to waste any money either.
I could feel a Guerrilla Garden DIY Chia Pet Adventure coming on, so I went cruising the internet and found several instructions for homemade DIY “Chia” pets.
Then I did some experimenting on my own to see what worked best and this is what I came up with…


")
These creatures definitely have a personality all their own and literally only cost pennies to make. They are fast growing, are self watering and need only minimal care to flourish making them a great garden project for children. Best of all this Parent/Grandparent Garden Hack could potentially help you to enjoy the last days of summer by staving off all those summer time choruses of “I’m bored” that your children or grandchildren are determined to bombard you with.
Here are some simple directions on how to create your own DIY Chia Pet Adventure:
Materials Needed
Stockings or Nylons
Potting soil
Grass seed
Elastic bands
Glue
Pipe cleaners, buttons, ribbon etc to decorate
Container
Rocks
1. Start by cutting the bottom section off a nylon stocking (or use an old knee-hi or nylon sock).
2. Add a small handful of grass seed to the very bottom, inside the stocking. This is where the “hair” will sprout.
3. Fill the rest of the stocking with enough potting soil to make the size and shape of “creature” you desire.
4. Tie a knot in the stocking so that the soil will hold its shape. Cut away any extra nylon, but leave a little tail as it acts as a wick to soak up water.
5. Now it’s time to give your creature some features! Use your imagination and a glue to create facial features and accessories by using things like googly eyes, paint, permanent markers, beads, felt, fun foam, pipe cleaners, pompoms, and yarn.
6. Once all the paints/accessories and glue are dry, the last step is to water your creature. Set your creature in a bowl filled with water, and leave it to saturate for a day. Then “stand” it up, wick side down in a rock lined container topped up with water. Check each day to make sure it remains moist and within a few weeks, your creature will start to grow hair.
Additional Tips:
- Grass seed can be substituted with Chia seeds, wheat grass seeds, alfalfa seeds, or bird seed.
- Potting soil can be substituted with sphagnum moss, peat moss or sawdust (the kind you buy at the pet store).
- To create a more 3 dimensional character, twist off and tie small sections of soil and seeds using rubber bands, pipe cleaners or string. You can form legs, a head, a nose, body sections or whatever identifying characteristics that you want for your creature to truly make him one of a kind.
- Once the “sprouted hair” is established feel free to take a pair of scissors and create a new hairstyle. Just keep in mind that if its cut too short or it dries out it might stop growing altogether. Also be aware that letting children think that it is OK to give haircuts whenever and to whoever they please usually does not end well…..if you get my drift.
- Be sure to top up the water regularly.
- Once the hair is growing you may want to occasionally spray your creature with half strength fertilizer.
- Don’t worry if your DIY Chia pet creature loses it’s hair it can still add a scarecrow element to your garden or possibly even become a handy companion for the HOV lane….or so I have heard.
And there you have it…..

Happy Gardening!

Guerrilla Garden Adventures
Inspiring Garden Rebels everywhere to make the world a greener, happier and more creative place.